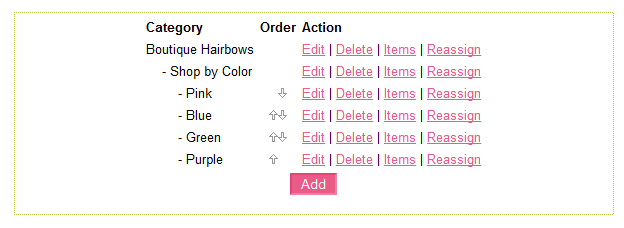
Boutique Hairbows
>Shop by Color
>>Pink
>>Blue
>>Green
>>Purple
See below for a screenshot of this example:

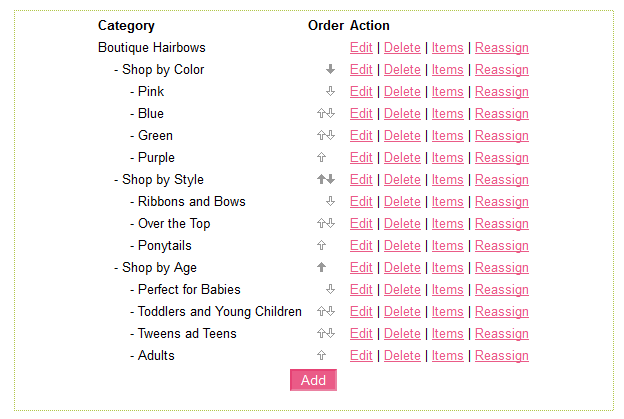
You can add in as many categories, sub categories, and sub-sub categories as you need.
A more robust example may look like this:

To add a category to your store, follow these instructions:
1. Log into your store admin.
2. Navigate to the "Categories" link under "E-Store".
3. Click on the "Add" button.
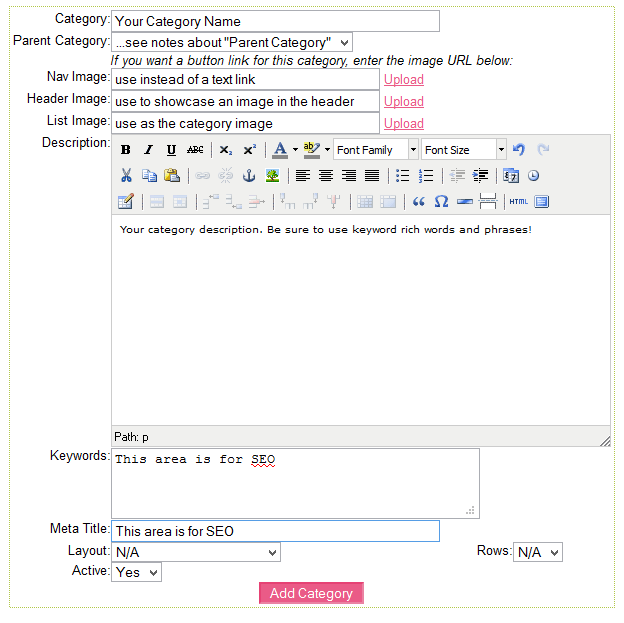
4. Insert your category details (see screenshot below).
5. Save your changes by clicking the "add category" button.
To add a sub category or sub-sub category, you will follow the above steps except for when you insert your category details, you will choose the parent category you want your sub, or sub-sub category to show up under. For example:

In our example, "Shop by Color" is a sub category of "Boutique Hairbows", so we've chosen "Boutique Hairbows" as our "Parent Category". Our sub-sub category for the color pink would be set up like the example below, because "Pink" is a sub sub category that will be placed under "Shop by Color". For example:

You can also delete categories, go back and edit your categories to make necessary changes and reorder your categories from this screen.
To edit your categories:
1. Log into your store admin.
2. Navigate to the "Categories" link under "E-Store".
3. Choose the category you'd like to edit from the list and click on the "edit" link.
4. Make your changes.
5. Save your changes by clicking the "edit category" button.
To reorder your categories:
1. Log into your store admin.
2. Navigate to the "Categories" link under "E-Store".
3. Choose the category you'd like to move up or down and click the small arrow in the direction you wish the category to move. See screenshots above for what these arrow icons look like.
4. Your changes will be saved as they are made.
To delete a category:
1. Log into your store admin.
2. Navigate to the "Categories" link under "E-Store".
3. Choose the category you'd like to delete from the list and click the "delete" link.
4. You will be redirected to a screen that asks if you are sure you want to delete. Choose yes or no to proceed.
5. Your changes will be saved as they are made.
Clicking on the "Items" link will allow you to view the items that are listed under this category.
Clicking on the "Reassign" link will allow you to reassign products under this cateogry.
For a full explination of the category set up page, see the image below:

Category: Enter your cateogry name.
Parent Category: This is an optional space to choose a parent cateogry from the drop down menu if you are setting up a sub or sub-sub category.
Nav Image: The Nav Image will show up (usually in your sidebar) as a graphic link instead of a text link. Usually this is not suggested, unless you are working with a designer and they have provided you with the graphics to load, or you are designing your own website.
Header Image: The Header Image will be showcased on the category, sub category, or sub-sub category page when your customer clicks to view that category. The way we usually explain this is to say when you visit an online retailer for jeans, when you click on the "Jeans" category, you will usually see an image showcasing models wearing the jeans that you can scroll through and view below. This is the "Header Image".
List Image: The list image is the image that will show up as the category, sub category, or sub-sub category image. List Images are they way your customers will navigate around in your categories, so make them beautiful! They are optional. If you choose not to use a List Image, a simple text link will show instead.
Description: This is where you will enter your category description. This description will show up at the top of the category page while your customer is shopping.
Keywords/Meta Title: These areas are for SEO. To read more about SEO, click here: http://www.bizzymamahosting.com/support/knowledgebase.php?action=displayarticle&id=180
Layout: Allows you to choose an alternate layout for the products that will be displayed for this category.
Active: Allows you to choose whether the category will be active, or inactive. You can reactive the category at any time.
Rows: Allows you to choose how many rows the products in this category will be displayed in.
If you have any questions about setting up a category, open a ticket and a member of our staff will be happy to assist you.

