Your Mal's account was created for you at the time of account creation (unless you brought your own account when you joined us!) and the details for log in were sent over in your "New Account Email". Your Mal's admin area is where you will set up your shipping, taxes, connect your payment processor/s and generate new gift voucher codes.
Mal's also provides the secure area for your customers to checkout, and for you to store their contact and billing information. While your current Mal's account (basic) is free, you may choose to upgrade. Upgrading your Mal's account is optional and is not necessary for the basic functionality needed to process payments for your online store. As of the writing of this article, the Mal's upgrade fee is $8.00 a month and includes a few additional features and shipping options in addition to those available on basic accounts. For more information on Mal's, payment processors, and the required settings, please see our Mal's specific knowledgebase area. You can also read more on the Mal's site. Lastly, you may be interested in some cool add ons for your Mal's account. Available addons include Quickbooks integration, the ability to sell digital downloads, and a popular shipping calculator.
NOTE: All of the required Mal's settings listed below were set up for you when your account was initially created. If you notice that you are having inventory, order, or sales problems, or simply want to double check your settings, you can do so by looking over the information and images provided below. You may also open a ticket and a member of our staff will be happy to review your settings and/or to process a test order for you. TIP: To expedite this process, be sure to include your Mal's log in details, username and password, if they have been updated from when your account was originally created.
For the purpose of this article, we will only be touching on the required settings in order for your cart to work. There are many other optional settings that you can set up and edit from within your Mal's account. These optional settings include setting up order receipts to be sent to the customer, creating coupons, setting up shipping and taxes, and more.
We also have an article the goes over your required PayPal Mal's settings, so we will not be mentioning those settings in this article, either. NOTE: You must have a payment processor set up at Mal's in order to start selling and accepting payments. If you're unsure of who to use, we highly suggest going with PayPal!
There are three primary areas that we will be visiting below.
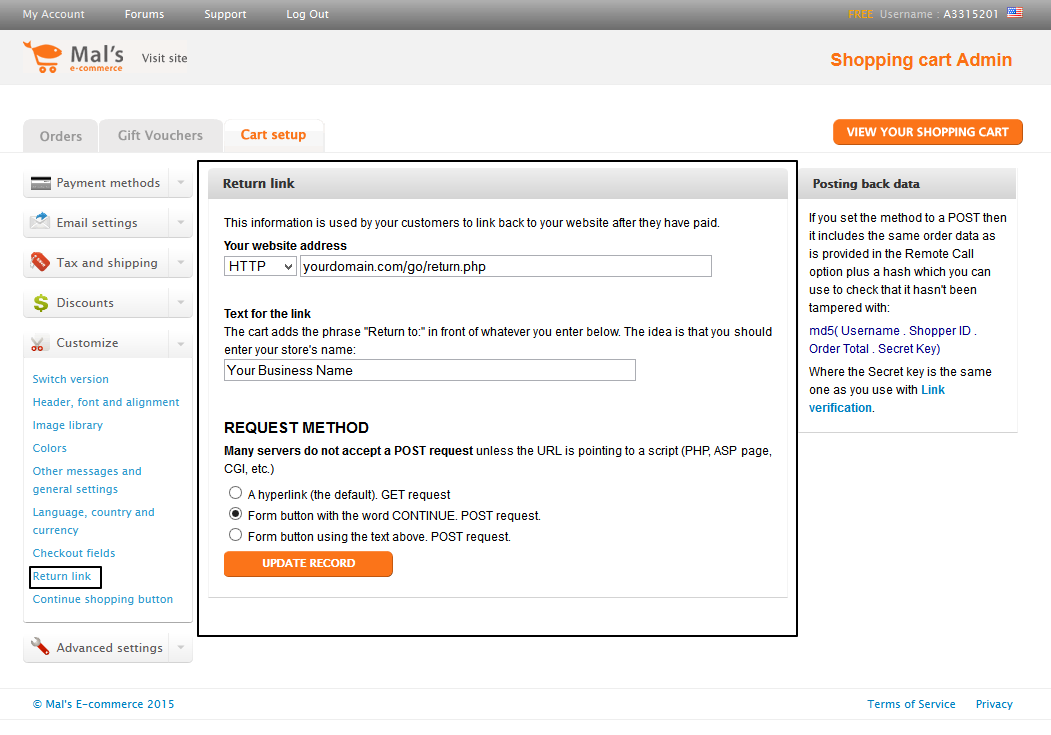
1. Mals/Cart Setup/Customize/Return Link
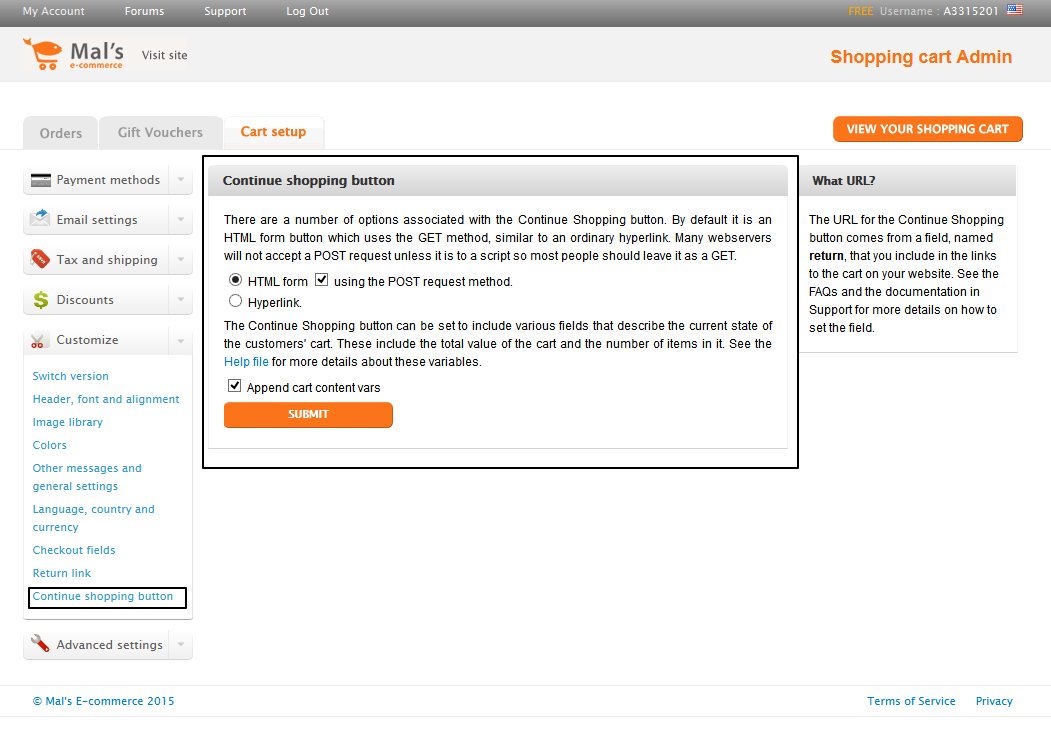
2. Mals/Cart Setup/Customize/Return Link
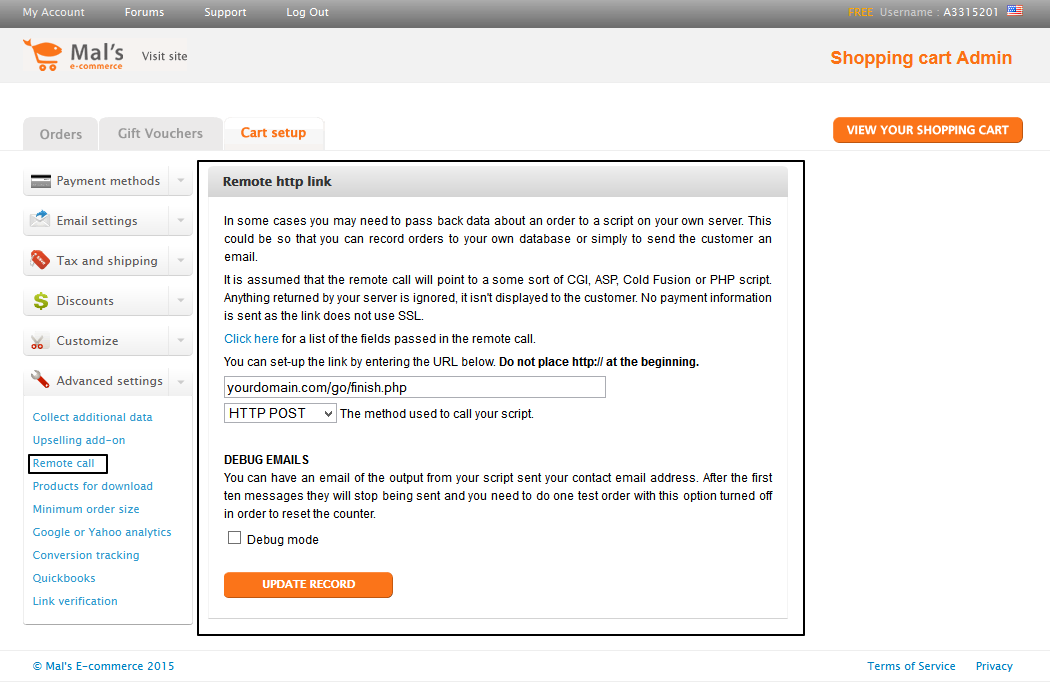
3. Mals/Advanced Settings/Remote Call
YOUR REQUIRED MAL'S SETTINGS:
Mals/Cart Setup/Customize/Return Link
In your Mals-E account, select the "Cart Setup" tab.
Then, find the "Customize" heading.
Finally, locate the "Return link" link
Choose "HTTP" from the drop down options
In the "Your website address" area, enter your store domain (URL) followed by /go/return.php
In the "Text for the link" area, enter your business name
Under "REQUEST METHOD", be sure that the radio button for "Form button with the word CONTINUE. POST request." is checked.
Be sure to save your changes!

Mals/Cart Setup/Customize/Return Link
In your Mals-E account, select the "Cart Setup" tab.
Then, find the "Customize" heading.
Finally, locate the "Continue Shopping button" link
Choose "HTML form" radio button and "using the POST request method." checkbox
Also, select the "Append cart content vars" checkbox
Be sure to save your changes!

Mals/Advanced Settings/Remote Call
In your Mals-E account, select the "Cart Setup" tab.
Then, find the "Advanced Settings" heading.
Finally, locate the "Remote Call" link
Enter your domain (URL) into the space provided followed by /go/finish.php DO NOT USE HTTP://
Choose "HTTP POST" from the drop down options
Do not select Debug mode unless directed by Mal's, or our support staff
Be sure to save your changes!

That's it! Open a ticket if you have any questions about this set up. You may also request a test order and a member of our staff will log in to verify your settings and complete checkout as a customer.

