First, navigate to store admin/E-Store/Products and choose the product you'd like to edit from the drop down menu. If you will be creating a new product instead, click the "Add" button. Once you have selected or created the product, enter or edit any information on this page and then scroll down to the bottom of the screen and select "Add Options"

From here, scroll down to the bottom of that page and select "Add Inventory"

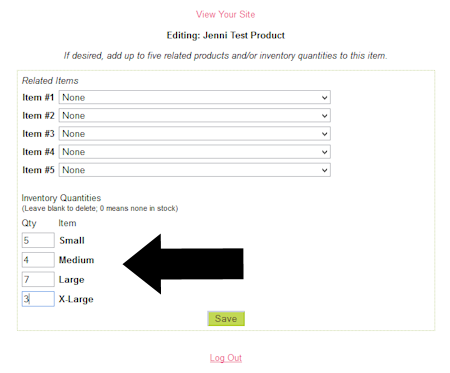
On this page you will see where you will be able to enter the number of products you have available to sell. If you have unlimited products and you want this item to be always available, just leave this box blank. Otherwise, if you have limited stock of this item, enter the number of products you have available to sell. When those number of products have been sold, the item will be marked "Out of Stock". A "0" entered in this space will mark the item as "Out of Stock". If you have set up attributes for this product, you will notice that you will be prompted to enter inventory for each option on this screen.

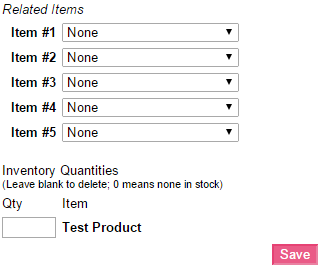
If you have not set up attributes for the product, or the product does not have options, you will notice only the product name under the "Inventory Quantities" heading.

Be sure to save your changes before exiting.
To add inventory to an individual product, follow these instructions:
1. Log into your store admin.
2. Navigate to the "Products" link under "E-Store".
3. Click on the "Add" button.
    You can also edit an existing product by choosing that product from the drop down and click "Edit".
4. Insert or edit your product details.
    Instead of clicking on the "Save" button to store these details and exit, click "Add Options" to be directed to the next page (see screenshot below).
5. If necessary, insert or edit your product attribute option details. (For more information see: Adding in Attributes)
    Instead of clicking on the "Save" button to store these details and exit, click "Add Inventory" to be directed to the next page (see screenshot below).
6. Each attribute option will have a text box for your inventory limit entries under the "Inventory Quantities" heading.
7. Input your inventory limits and save your changes.
Editing multiple product inventory limits at once:

To edit the inventory of multiple items at once, follow these instructions:
1. Log into your store admin.
2. Navigate to the "Products" link under "E-Store".
3. Scroll to the "Quick Inventory Update" heading immediately under "Advanced Item Search"
4. Sort items to edit by category by using the drop down menu, or by any of the other sort options provided.
5. Click the "Edit Inventory" button.
6. Input your inventory limits/make any necessary changes and save before exiting.

